Did you know that changes in your daily driving habits can have a significant impact on how often you should check your engine oil?
As a responsible car owner, you’re likely aware that keeping an eye on your oil level is key, but varying weather conditions, frequent short trips, or extended periods of high-speed driving can necessitate more frequent checks.
You might consider checking your oil every few weeks instead of monthly under these circumstances.
Wondering how these factors specifically impact your oil’s health and longevity? Let’s explore what signs to look for and how to adjust your maintenance schedule accordingly.
Importance of Regular Oil Checks
Regularly checking your engine oil is essential to prevent engine problems and guarantee peak performance. Establishing a habit of checking your oil on a regular basis is important for maintaining your vehicle’s health.
By adopting this practice, you join a community of responsible vehicle owners who understand the importance of engine care. Checking your oil allows you to detect low levels early, which is critical in preventing engine damage and safeguarding your safety on the road.
It’s more than just a maintenance task; it’s a commitment to vehicle longevity and reliability.
Ideal Frequency for Oil Monitoring
To guarantee peak engine performance, you should check your oil at least once a month. Establishing a regular routine for monitoring your engine oil is crucial not only for the vehicle’s longevity but also to ensure you’re part of a community committed to responsible car ownership.
Here’s how often you should check your oil:
- Monthly Checks: Even if your car is newer, making it a habit to check your oil monthly can save you from unexpected troubles.
- Every 1000 Miles: For those who drive more frequently or have older vehicles, checking your oil every 1000 miles or every 3-4 fuel fill-ups is advisable.
- Before Long Trips: Always check your oil before hitting the road for a lengthy trip. This preventive measure can avoid mid-journey breakdowns.
- Seasonal Changes: Temperature shifts can affect oil viscosity and performance. It’s wise to check your oil as seasons change.
- Post-Service Verification: After any engine work or oil change service, verify your oil level to ensure it’s been filled to a proper level.
Step-by-Step Oil Checking Guide
Begin by parking your vehicle on a level surface and allowing the engine to cool, ensuring an accurate oil level reading when you check. This initial step is vital for obtaining an exact measurement and is a foundational part of performing regular oil checks.
Next, locate the oil dipstick, typically found near the engine. It’s your key tool for this task. Pull the dipstick out and use a clean rag or paper towel to wipe it off. This clears any oil residue and prepares it for a true read.
Once clean, reinsert the dipstick fully back into its tube, then pull it out again to check the oil level. Carefully observe where the oil mark hits on the dipstick. It should be between the minimum and maximum lines.
If you discover a low oil level, it’s important to add oil gradually. Pour small amounts, checking the level each time, to ensure you don’t overfill. Always adhere to the manufacturer’s recommended oil type and quantity to safeguard your engine’s health.
Interpreting Oil Condition and Levels
After checking the oil level as described, it’s important to assess the oil’s color and clarity to gauge your engine’s condition. Fresh oil should appear clear amber, caramel, or tan. If you notice the oil turning dark brown or black, it’s a clear signal that contaminants are present, and you might need an oil change.
Regularly monitoring oil color helps you catch these changes early, fostering a sense of responsibility and community among savvy car owners like yourself.
Here’s what to look for when you check your car’s oil:
- Color: Fresh oil will have a light, clear hue. Dark oil suggests dirt or heavy use.
- Texture: Feel for grittiness when rubbing the oil between your fingers. Any particles are a bad sign.
- Clarity: Cloudy oil can indicate the presence of contaminants like coolant or water.
- Smell: A burnt odor is a red flag and should prompt further investigation.
- Level: Always make sure the oil is between the full and low marks to avoid engine stress.
Troubleshooting Common Oil Issues
When you notice unusual engine noises or a burning oil smell, it’s crucial to promptly investigate these signs as they may indicate serious lubrication issues. First, check your oil level using the dipstick; if it’s low, top it up to the marked safe level.
Examine the oil color. Dark brown or black oil suggests contamination and is a clear sign you’re due for an oil change. Fresh oil should be amber in color and free of particles. Changing your oil according to the manufacturer’s schedule helps prevent buildup and maintains engine efficiency.
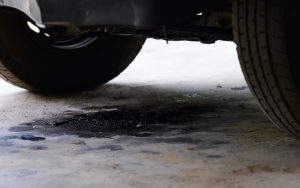
Be on the lookout for oil leaks. Spots under your vehicle could be a telltale sign. Inspect the oil filter and oil pan gasket for any signs of weakness or damage that might be causing the leak. Tightening connections or replacing faulty components can often resolve the issue.
Don’t ignore your dashboard warning lights. An illuminated oil pressure or oil level light demands immediate attention to prevent further engine damage. In such cases, consulting with a professional is advisable to keep your vehicle in top condition.
Conclusion
You might think checking your oil regularly is a hassle, but it’s easier than facing major engine repairs. Stick to checking monthly or every 1000 miles, especially before long trips or seasonal shifts.
Just pull the dipstick, wipe, reinsert, and read; the whole process takes mere minutes.
This simple habit not only prolongs your engine’s life but also enhances its performance, ensuring you’re not caught off guard by preventable issues.